Saturday, May 02, 2020

Stringing and Tangent Challenges - Part 2

Now that the strings have nice little loops on one end, I hitched them on their appropriate hitch pin. Because I'm working from the treble down, the first hitch pin I used is on the back rail, farthest to the right and closest to the treble end of the instrument. Stretching the string to approximately nine inches beyond the right side of the cabinet, I used a small scissor to cut off that length. This is the .012 sting, the thinnest of all.

Here's where the other end of the dowel with the cup hook is used. I had drilled a hole using the #30 bit (same as for the pin block) to accommodate a tuning pin. Making sure I was holding the wire tight so as not to lose it off the hitch pin, I took the other end and poked it down into the hole. I then crammed a tuning pin in the hole also. Turning the tool away from me, I made two or three wide rotations of wire to bring it up to the beginning of the flat part of the tuning pin. I was winding up the pin, from left to right.


I then turned the tool a little and began to wind the string down the pin from right to left, making sure to wind back over the left-rigt rotation and being careful to not wind the wire on itself. I tried to keep the coil as neat as possible.


After a few wraps, I removed the pin from the tool, brought the left-to-right wire out, returned the pin to the tool and continued to wind until I was over the appropriate hole in the pin block. In the picture below, you can see all my little "wild hairs" on the other strings I've wound. For now, I'm leaving those in the event I have to redo those strings because I've failed to secure them adequately and they slip. I'll try to salvage the string by unwinding it and trying again to get it right. Fingers crossed I won't have to do that.


For me, winding turning pins is a little like riding a bicycle. It comes back to you when you've been away from it for a while. Still, I'm not as confident as I'd like to be, so I'm not brave enough yet to trim those little wild ends.

The wire needs to pass over the correct pin on the bridge and come off the right side of the pin.  If it's not, it's been wound backwards and you have to carefully unwind the string and do it over, hoping against hope that the string will hold up for a second go.

Taking the pin out of the tool, I hammered it into place until it was about 7/8" above the block and turned the pin with the tuning hammer just enough to confirm that the wire was holding, but not bringing it anywhere near pitch just yet. The 7/8" in pretty important because the lid won't close if they stick out much higher. The wire should be wound to about 1/4" above the soundboard. If it's not, the wire gets spaced out more on the pin to meet that requirement or, conversely, you have to try and slide it up higher on the pin, being careful tat the string doesn't double up over itself.

Then I repeated everything on the next string to the left. Each tangent is responsible for two strings, so you have to string a pair before you go on to place the tangent. I'll tackle that blog entry tomorrow.

Stringing and Tangent Challenges - Part 1

(While my blog posts might seem exceedingly detailed, my purpose in writing this - aside from sharing with a very narrow audience - is to have a written record/diary of my journey. I hope to eventually store it all on a thumb drive to keep with my finished instrument.)

The whole process of stringing and inserting tangents is fairly involved, so I'm going to divide this into three parts.

I had a small problem with the pin block holes being too small and, in many cases, not deep enough. I had been on a bit of a hiatus (moving, moving out of state, selling a house, buying a house, you know the drill) and didn't take notes on what I did/thought or didn't do/think with that pin block, so I decided I just needed to go over all of the holes again with my #30 drill bit, take out all the keys, vacuum out the case, and then forge ahead. Done.

The top ten tangents strike extremely thin strings. The tangents' thickness is needed on the mid and low strings to produce a pleasing sound, but it's too much for the uppermost fine strings and must be thinned by half. To accomplish this, my husband (turned clavichord sous chef) used F. Dick's No.2 diamond file that I had in my silversmithing supplies (another hobby of mine which distracts me from time to time). After four to six passes on each side of the tangent, thickness was checked and additional passes made until the desired result was achieved.


While my husband worked on thinning tangents, I worked on installing a couple of strings so we could insert those tangents in their corresponding keys. It's not advisable to string the whole instrument and then try to go back and put the tangents in the keys. The reason for this is that there's a lot of removing and replacing a key as you work on it, and all those strings would get in the way. While I'm told it can be done, it makes an already tricky job more difficult. So we are inserting the tangents as we go and therefore working from the highest pitches down to the lowest.

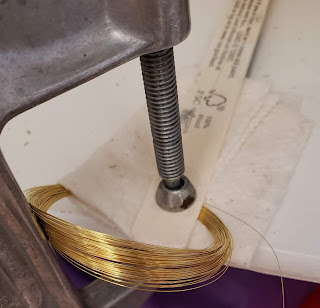
The first step is to make a nice loop that will catch on a hitch pin and not unravel under pressure. The coil of string needs to be clamped so that you can pull on the string and form the loop.  Here's my fancy setup off a closet shelf. I've protected the coil with quilt batting and sandwiched it all between two paint sticks. A big C-clamp (which might actually be a leftover from my harpsichord-building days many moons ago) holds it all together.


About an inch from the end of the string, an angle of what I'll call a narrow 90-degrees is formed by gently bending the wire on a cup hook that has been inserted in a dowel.  The hook needs to dissect that angle formed by the wire so that as the dowel is turned, a helix is formed. Sorry the pic is blurry.


I made enough turns to produce about 3/4" of twists. At that point, I turned the short end of the wire perpendicular to the helices and make about five turns to finish off the loop. These last turns are not forming helices, but cause the short end of the wire to wrap around the long wire to make a pretty finish and secure the helices. I'll probably go back and trim the ends a little, but for now, this will do.


A note on the dowel with cup hook: I used a fairly thick dowel because this tool does double duty. One end has the cup hook, but the other end is drilled with a #30 hole to insert a tuning pin. There will be pix later on in Part 2. This setup facilitates winding the string. The skinny little dowel which was included in the kit was barely larger around than a #30 hole and promptly split when I drilled it. So I used a fatter dowel that I had purchased for another project and am quite happy with it.

My next installment will explain how I wound the strings around the tuning pins. Later...

Thursday, February 13, 2020

A Picture is Worth a Thousand Words

I've been discouraged, to say the least, by the so-called stringing schedule supplied with this instrument. I'm a visual learner. I dig diagrams. I like to compare things side by side. So it comes as no surprise that stringing this instrument has been a real challenge for me. And when I feel like I'm spinning my wheels and making no progress in understanding, I find excuses to set it aside.

But now I no longer have any excuses.

If you'll recall, I've built two Flemish harpsichords, and they were pretty easy. As a result of that previous building experience, the actual physical winding of string is less of a challenge to me than might ordinarily be true. Plus, one key, one string. Or couple the 8' and 4' together, the concept being the same. But even so, one string, one jack, one plectrum for each pitch. The stringing schedule was clearly spelled out on a chart (as I recall). Piece of cake.

That's a different animal from this fretted clavichord. With this instrument, the trick is deciding which gauge goes on which tuning pin. The table which was to serve as a guide to stringing was quite confusing to me. Writing to the author of the manual was less than enlightening, but with those insights in concert with my more analytical husband's ability to translate things for my right brain, I think I've got it.

My first bit of confusion came with the use of the term "course." A simple definition I came up with is: a collection of pairs of strings of the same gauge. Adding to the mix is that one set of instructions has to serve two different ways of stringing the instrument. The manual says that eight courses of string will be supplied in individual, labeled envelopes with the notes for which they are intended written on each one. That is not so. First, all strings are twist-tied and labeled only with the gauge on the twist-tie. All were packaged together in one plastic bag without further labeling or identification. Second, there are only seven gauges. I had to write for clarification. Turns out, the eighth gauge is for wound strings for the eight lowest bass notes, "which obviously (I) did not order. Ignore that." All righty, then. That's helpful to know.

Clarifying in my mind what is meant by the term "course" (simply put, gauge), I then had to decide what gauge goes with which note, and by extension, which tuning pin. Again, my strong reliance on visual learning kicked in, so I either needed a better, clearer chart or a diagram. Hubby and I did a lot of out-loud thinking and came up with something I can work with.

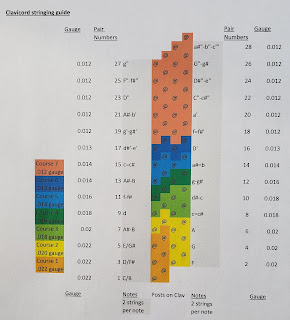
Are there other visual learners out there like me? If so, I've drawn a diagram of the pin block, showing what gauge goes where and to which "course" they belong.


My husband then took it to the next level and created a prettied-up version on the computer with full color coding which tells me what I need to know at a glance.


Now I can lay a diagram next to the pin block and quickly and easily see what gauge to use next. Stay tuned for a post dealing with tangent placement. I'm hoping it will be relatively easy since the blueprint shows where to place each one. Onward and upward!

Sunday, May 19, 2019

New Roofs!

Since I last posted, I've been dealing with roofs, both traditional and clavichord-related. We roofed and sold our old house, moved halfway across the country and repaired a roof on our new house, and then (best of all), I roofed my clavichord keys!

Because the keys on this instrument are exposed to view, they really need to be carved in a decorative way. It's not mandatory, but the old instruments would have had it, so of course, I had to do it.

The manual says to use a knife, but I am not a wood carver, and I'm pretty certain I would have carved more of myself than the wood if I had tried to use a knife. And this is the 21st century. The builders of old used tools available to them at the time. I'll use tools available to me in my time. So, trusty Dremel to the rescue. I'm actually quite handy with the little tool.

I used 240-grit sanding bands on the sanding mandrel attachment. (The only other grit available was 60 which is too coarse for the soft wood of the keys.) I started sanding at the sharp edge of the key which is midway between the top pencil mark and the side pencil mark. By positioning the Dremel on that edge and keeping the two pencil lines in sight, I was able to achieve a nice slant, curving up on the ends.


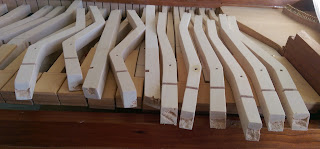
The round barrel helped me to create those little ski tips quite easily.  I flipped to the opposite side and carved the opposite slope in the same manner, thus creating the central ridge on the top of the key. It was a messy job that created a lot of sawdust.


After completing the heavy sanding, I then hand sanded each key with a fine grit paper to really clean and sharpen up the little pitched roofs.

And here they are, all back in place and looking great!


Friday, October 13, 2017

The Keyboard - Part Three

Since I've decided to roof the keys, I had to take some time to draw lines on all the keys to help guide my carving efforts.

The carving is done on the section of the key that is cranked sideways.  My keys came with pencil lines already drawn at the two "joints."  I added another line that is 1/4" inside of those two lines.  Rather than measure each and every line, I constructed a cardboard template that was the required width and worked through the keys individually by laying that template against the supplied pencil lines and drew.  It might have been quicker to put all the keys back on the rack and draw one long line with a straight edge, but to be honest, I just didn't think of it. 


Next, I drew a north-south line down the center of each key, connecting those horizontal lines. I eyeballed two center points (I'm very good at that) and used a straight edge to draw.


And finally, I made another template, this one 3/16" and used it to draw a line on the two sides of each key. I had some trouble wrapping my mind around that step, but the ah-ha moment arrived as sleep escaped me in the wee hours. Here's a typical key with all the lines drawn.


The idea, as I understand it, is to carve the wood from the side lines up to that center line and create a profile similar to a pointed roof.  I'm still puzzling over that quarter-inch edge at the top and bottom. It has been described as similar to the tip of a ski. Perhaps it will become clear as I'm drifting off tonight.

This whole undertaking promises to be quite an endeavor. Wish me luck!


The Keyboard - Part Two

Enough fussing over the keyboard!  A few of the naturals are a little heavy and don't pop back up when I depress them, but they're moving well, so I'm not overly concerned. I expect the keys to behave when I lighten them later on.  I have to admit that it bothered me for the longest time, but it pays to read ahead. (Actually, it pays to read the entire manual before beginning.)  I had a really hard time dealing with one key in particular that just didn't respond at all. I finally decided the balance pin was the culprit, gave it a tap to line it up better, and voila! Fixed. Everything is now moving in an acceptable way.

Time to add the cherry wood sharps. 

I laid a nice, perfectly-sized, heavy level across the keys, checked the distance between the white keys, making sure they were reasonably equal. Any that seemed off a little had their sides sanded to help even up those spaces or received a tap to their balance pin. Using the level's straight edge, I set the first and last cherry tops on the keys, keeping a 1/16" gap between the front of the sharp and the back of the cutout on the naturals and visually centering them between the neighboring naturals.The manual said to clamp the straight edge down, but for the life of me, I just couldn't see it.  The level had enough weight by itself. 


And by the by, there is a front and back to those sharps!


The glue went on those two sharps and I backed them up against the level/straight edge. I left them alone for 24 hours, just to be safe. The next day, I glued the remaining sharps, again taking care to visually center them between their neighboring naturals and butting the back sides up against the level. Easy. Again, another 24 hours to dry.


Next came rounding all the edges of the keys. The manual suggested using a mill bastard file, but ever the independent one, I turned again to my trusty Dremel and sanding sponges. Lots of dust, but the naturals all look really nice with their rounded, almost beveled edges. They look as if they are a bit worn from years and years of playing.  


The edges of the sharps were simply softened with the sanding sponge. I love them!  


I plan to sand all the keys with finer and finer grades of sand paper, but I'm waiting until I roof the keys.  Oh yes, I can't resist. I'll be roofing those babies!  When I am finished with that, I'll treat the key covers (both sharps and naturals) and key front moldings to a coat of tung oil - the same oil I used on the case.

As for the roofing....

I'm not a woodworker. I don't carve. But I just have to take this extra step. This will require a little bit of study on my part and probably a whole lot of time!  Stay tuned...


Friday, September 29, 2017

The Keyboard

I actually have spent an inordinate amount of time fiddling around with the keyboard. Every key has been lightly sanded on the sides to make them all nice and smooth and the little thumbnails were glued in and shaped. I used my trusty Dremel.


With the keys all returned to the rack, I looked for any that seemed to lean a little bit right or left, causing the spaces between the keys to be uneven. A little tap to the balance pins one way or the other helped. 

The north/south unevenness of the keys will be corrected later on when I balance them. But that's a ways down the road.


To help me get a good visual, I took the name board and fall board and laid them across the backs of the keys to hold them all down equally. 


Much better.


I'll probably do a little sanding on the sides of a few of the keys to even up a couple of spaces that still need some more help.  

Next came inspecting the ends of the (soon to be) black keys.  The ends of many of them were really chewed up, almost as if termites had been nibbling away.  


The manual says to make sure the ends look good.  The only fix was wood filler. Not a very good match, but I suspect those ends won't show very much, if at all. And I'm hoping the critical eye will be drawn to the pretty cherry wood tops that will be added next.


Sunday, May 18, 2014

Jigs and Assorted Pins

It took two brains and three hands (four if you count the pliers), but the hitchpins, balance pins, felt punchings, and backrail felt are now in place.

The balance pins were easy enough.  We needed a small piece of wood to make a jig.  A piece of Robert Shields's handcrafted (and signed) furniture came to the rescue.  A small block of wood fell off the bottom of this cabinet and we realized it was the perfect size for our needs.  Isn't it a great cabinet?


The little block of wood measured 5/8" which was the exact size I needed.  We drilled a hole through it with a #30 bit which allowed the balance pins to slip through easily.


So this musician turned work worker learned that "jig" is more than a dance form.

Next, we tackled the hitchpins.  This was far trickier because they're lined up very closely together.  I had already drilled the holes, so it was just a matter of tapping these little darlings into place.  They needed to be tapped to a uniform height, so we marked the needle-nose pliers with masking tape to show us where 5 millimeters' distance would be. Since these pins are very close to the wall of the case, we felt very clumsy and all thumbs, but we got it done with the help of the nail set used upside down.  We felt we had better control using it that way.  I held the nail set, and my husband did the rest.


Because the needle nose pliers are tapered, we just measured the point at which the height of the pliers was 5 mm and marked it with tape.  When the hitchpin was level with the top of the pliers, we knew we were at the proper depth.  It was a jig of another sort, I suppose.  Here's a shot of us working on the pins on the backrail.


And here is a shot of the pins all in their proper places in the bass hitchpin rail.  As you can see, the wood got a little marred in the process, but I believe that when the strings are in place, it won't be very noticeable.  Down the road, I may decide to refinish those spots before I string.  I'll just have to see how I feel about it.


My third hand was gone when I laid the black backrail felt.  Again, it seemed like I had ten thumbs, but by wedging the needle nose pliers against the balance pins while the nose of the tool held the little 1/2" nails in place, I managed to get five or six nails tapped into the cloth using the wrong end of the nail set once again.  The little red felt punchings went on the balance pins, and this day's work on the clavichord was done.


Tuesday, May 06, 2014

Keywell Label

The word "label" in the instructions finally hit home.  My wheels grind slowly...

I had a couple spare Avery 22809 labels.  They are a fun shape, and the texture is like a laid linen, so one was pressed (get it?) into service.  Using Avery's online template service, I found an acceptable design, filled in my name, location, and description of the instrument, and then added a small picture of myself.  Now when the instrument is discovered in some dusty old junk store by a wise and wonderful keyboard musician of the future, s/he might notice something hiding beneath the keys.  Closer inspection will reveal all my info with a very small picture of me, the builder!  I thought it was a unique, albeit 21st century, touch to my little clavichord.  Check it out!


Sunday, March 23, 2014

The Box is Complete!

Who knew that finding a 1/2" knob would be so tricky?  I searched high and low at every local place you can imagine:  antique stores, Menard's, Lowe's, you name it, I was there.  No dice.  Or rather, no knob to my liking.  After expanding my search to online sources, I finally found a suitable knob at MyKnobs.com (but of course) - a perfect little burnished brass thing that was just the ticket at $2.73!  What a bargain!  I placed the order.  Shipping was $7.95.  

Wait.  

What????

Here's the little knob:

And here's the box in which it came!

Okay, so the knob ended up costing $10.68.  Here's a news flash to MyKnobs.com:  You can put that little 1/2" sucker in a small padded envelope and mail it First Class for under $3.00.  I swear, the bigger the company, the dumber they come.

Anyway, I drilled a hole in the center of the box lid, measured the screw for length and then cut it off with a cutoff wheel on my trusty Dremel, and voila!  Here it is!


How stinkin' cute is that?!?  I did have to trim the lid a smidge to get a perfect fit, but it was no big deal.

All that is left is placing my identifying mark on either the nameboard or on the inside of the instrument close to the hitchpin rail.  Since most builders did the latter, I believe that's what I'll do as well.  Pix to follow.

So, I'm finally at the point of No More Excuses (unless you count my piano students, my kiln adventures and orders, and a backlog of mysteries on my Kindle).  It's time to move on to the guts of the instrument.  I better get after it before Daniel Silva's new book comes out in July because I will be unavailable until The Heist has been devoured and thoroughly savored.


Tuesday, March 11, 2014

Fiddling with the Box

I wanted to line the box with something that was not permanent; something that I could remove if I changed my mind or wanted some variety, or could be replaced if it became soiled or tired looking.  The idea I came up with was to somehow adhere a fabric liner to the box.  I wandered Hancock fabrics and waited for something to call to me.  Here's what I found!

  
To stick the fabric to the inside of the box, I chose Aleene's 2-Sided Adhesive Sheets.  Since the inside shape of the box is a little tricky, I cut paper templates and cut the fabric to match the shapes, making sure I had at least 1/4" of fabric to turn under and create clean edges.  The adhesive sheets are very thin and extremely sticky and are holding the fabric very nicely. 

Here's a picture of the finished liner with the tuning hammer stored inside.  


Yes, it's totally out of character for the instrument, but it's my little secret.  With the lid in place, no one will know about it except me.  Using old, yellowed music might have been a better idea, but I wanted something a little softer.  Fabric made sense.  Besides, I can always change it in a heartbeat!

I'm now on the hunt for a little knob to put in the center of the box's lid and did actually come close while digging through drawers of hardware odds and ends in an antique store located in Omaha's Old Market area.  "Close" is the keyword.  Looks like I'll be ordering something off the Internet.  Stayed tuned.

Wednesday, November 20, 2013

Finishing the Cabinet

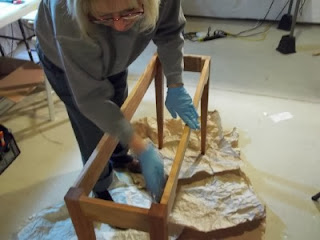
For arbitrary and capricious reasons (mostly laziness, I suspect), I elected to use tung oil to finish the cabinetry.  I mostly wiped it on with a lint-free cloth.  This first picture shows the difference the tung oil makes on the wood.  Since the Flemish harpsichords I built had painted cabinets, I was totally inexperienced with finishing nice wood, so I was really surprised at how much the tung oil darkened up the cherry.


Here I am applying tung oil to the clavichord stand.


This next shot shows the various parts of the lid which are drying.  I took extra care to avoid getting the oil on those areas of the lid's frame that will be glued.  The center panel needs to float with the humidity and is not glued into place, but is simply held by the lid's frame.  Since I have no way of truly knowing if the center panel is fully dry or not, the possibility exists for it to shrink in size a little, thus exposing more of its unglued edges. By finishing the entire center panel before assembling it with the fourth side of the lid's frame, I will prevent an unstained edge from appearing should the wood ever shrink. Look at that glow!


Here's a little fine brushwork on the soundboard molding.  I stuck down two widths of masking tape on the soundboard in case I got a little sloppy.  I removed the tape very quickly after the second coat of tung oil was applied to prevent any sticky residue from making itself too comfortable on the soundboard.


Two coats did the job with a 24-hour drying period in between.  The second coat took about half the time of the first coat.  Tung oil sure stinks, but I'm really pleased with the results.