Tuesday, April 27, 2021

Quarantinewhile...

It's amazing what a global pandemic can do to nudge all those unfinished projects to the finish line. I had more than enough stuff going on to occupy my time, and my clavichord was on the list. You can hate me if you want, but I didn't mind locking down and staying away from everybody who doesn't live with me. 

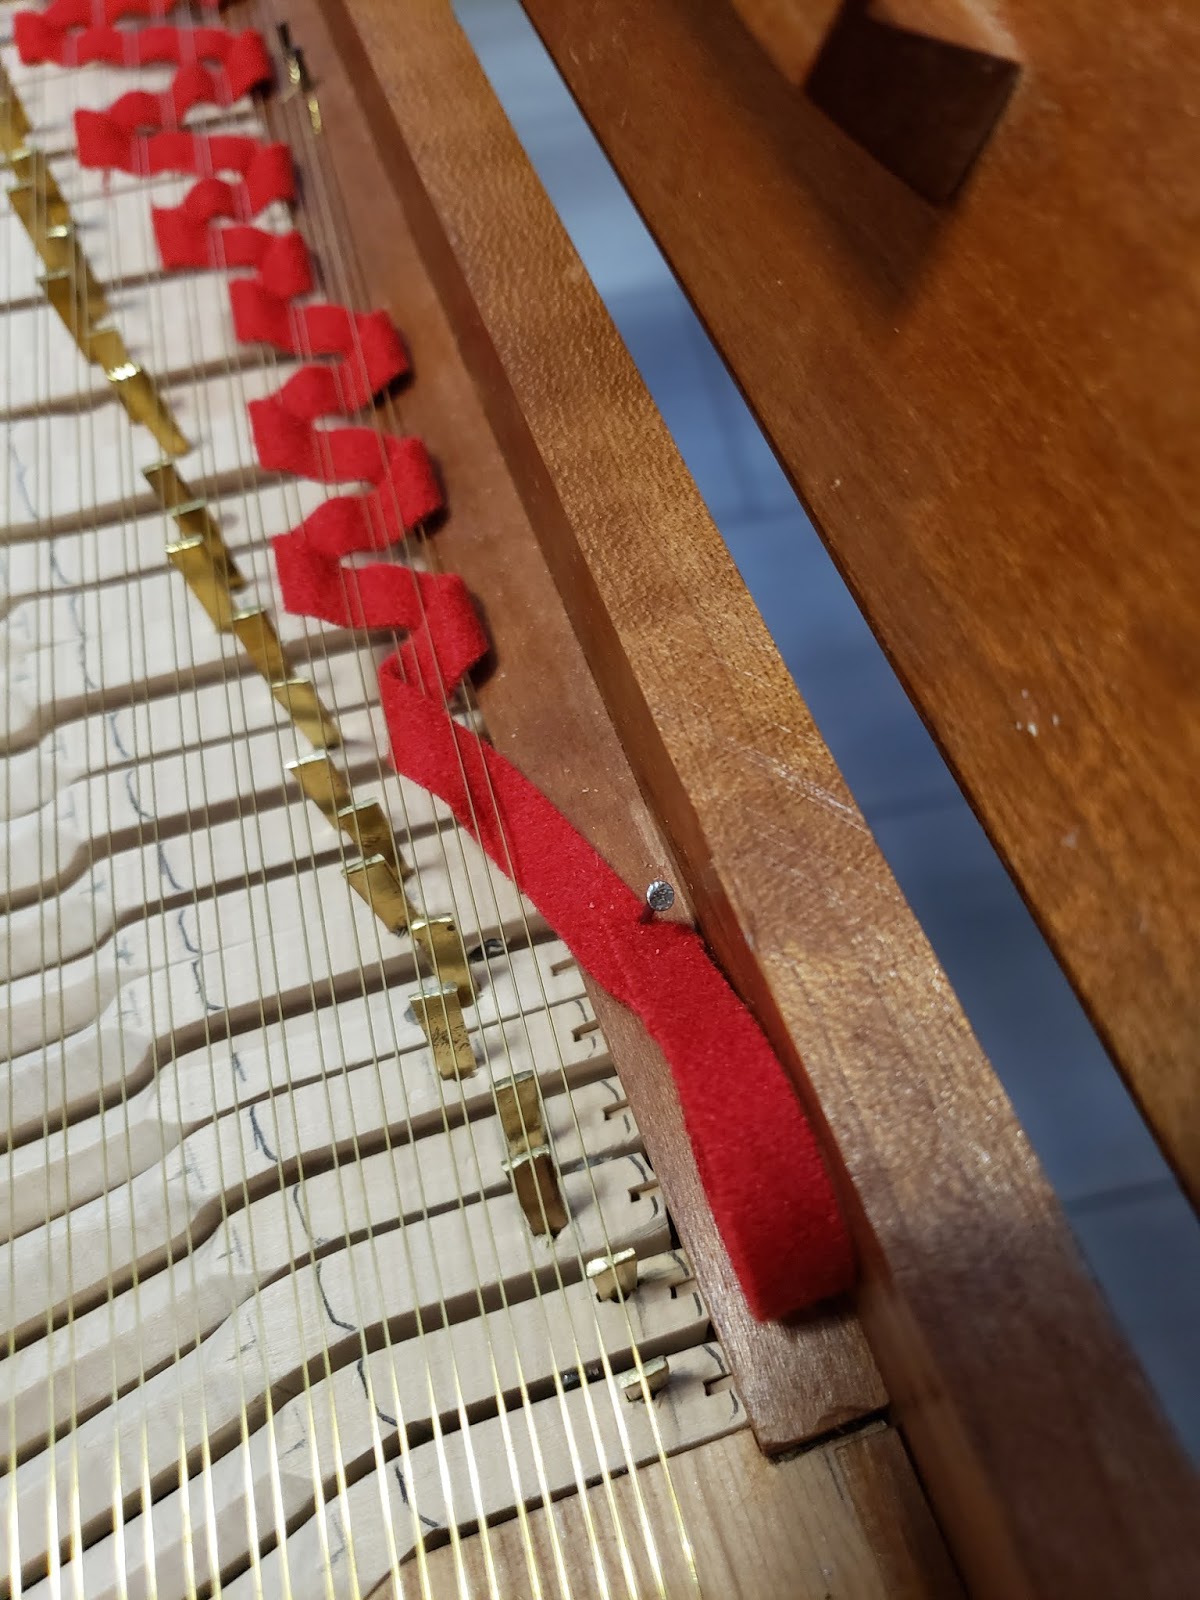
This little instrument holds its tune amazingly well. A few tweaks here and there were needed, but overall, it doesn't require frequent tuning like my harpsichords did.  And the best part is that after I set the temperament, trying to stick to the naturals only as much as possible, and tuned octaves, the sharps pretty much fell into place. For those that needed a tweak, I simply bent the tangent a tiny bit one way or the other. Voila!

Now, how do you set that temperament, you may ask. Good question. I'm not going to be much help to you, I'm afraid. After reading all my options, I decided to go with what I know and fall back on my harpsichord skills, set an even temperament (which the manual really discourages), and see what would happen. This decision was made based on the fact that I do occasionally like to play contemporary repertoire. And, if I'm being completely honest, the other options made my head swim.

I picked a pitch to call "A" (I opted to get fairly close to 440). Since this is strictly a solo instrument, an instrument upon which to practice by myself, tuning exactly to A440 is not required. But I still wanted to be fairly close. From there, I tuned wide fourths and narrow fifths. I listened for beats. When I heard the wah-wah of the interval go completely dead, I knew I had a perfect interval. In the case of a fifth, I then tuned that new note a smidge flat - just a hair. I did the same with fourths except I tuned it a hair sharp. When I had set all the fourths and fifths in the center of the keyboard, I then tuned octaves so that they were without any beats, or wah-wahs, whatsoever. For example, when you play your A440 and the A an octave higher together at the same time, you'll hear some beats, like a vibrato. But as you tune that upper A, eventually those beats become slower (to my way of backwards thinking, wider apart) until suddenly, they just disappear. That's when you've tuned the octave perfectly. Then you move on to the next note.

Learning this skill did not come to me overnight. As an undergraduate, I practiced my tuning skills a lot on the school's harpsichord. Early on, I suffered practice with a very imperfectly tuned instrument and depended on my teacher to handle the tuning when time permitted. But eventually, I got the hang of it and remember feeling pretty proud of myself the first time it sounded good. But what did I know? I clearly recall walking into my next harpsichord lesson and my professor asking me if I had tuned the harpsichord. At the time, I was probably the only harpsichord student, so it was either me or the luck of temperature and humidity that worked some pretty fancy magic. I admitted that I had indeed tuned it (with the help of a few glasses of wine, although I did not confess that bit). He said, "It's very well tuned, Debbie. Good job!" So that helped nail the A that semester. I think the wine helped also.

So this is the end of my clavichord saga, although I'm perfectly aware that it will never really be finished. It took me forever to accomplish this because life managed to get in the way. But it's done, and while it is far from perfect, it is mine!  


Tuesday, July 07, 2020

Tuning Wedges and Chipping to Pitch

Next is bringing each string to an approximation of its intended pitch.

Bearing in mind that each tangent strikes two strings, one must devise a means by which to damp one of the strings when performing tuning tasks. While I may eventually create something a bit more permanent and sturdy down the road, for now I used corrugated cardboard. After cutting a 1/2" wide by 2" long strip, I glued a 2-inch strip of listing cloth on one end (a glue stick on the cardboard did the trick), folding it over so there was one inch on each side of the cardboard.  I made two while I was at it.


Sticking a wedge between the upper sting of the pair I was tuning and the lower string of the next ascending pair allowed me to chip a single string to pitch. After trying a recorder, then a guitar, I decided that my piano would be quickest and easiest. So I moved the clavichord into my music room and carried on. It really doesn't matter where you start on the keyboard, so I elected to start with the A below middle C. I guess it was just force of habit because that middle octave is where I would set my temperament on my harpsichords.

After getting that A tuned, I then moved the wedge up and out of the way and tuned the second second string of the A pair. One must listen for beats, and when those beats disappear and the second tone sort of melts into the other string's sound, the two strings are then perfectly tuned to each other. I refer to the vibrations going "dead" at that point. I'm not sure if that's a technical or even an appropriate term, but it's how I hear it and think of it.

During this entire chipping process, I snapped one string and had to redo it. Most likely, the string had a kink in it somewhere or I had somehow crossed the string over itself on the tuning pin. Regardless, it was a quick fix, and to be honest, I'm surprised I only broke one!

So now, I'm letting the instrument settle in at rough pitch while I read up on temperament options for the final tuning.

Thursday, June 25, 2020

The Listing Cloth

At this point, the end is in sight! I'm so excited!

The listing cloth is woven between the pairs of strings and serves several purposes:
  • prevent the tail of the string (the "unwanted" part of the string) to vibrate, i.e., sound, when the tangent strikes it
  • stop the entire string from vibrating when the key is released and the tangent leaves the string.
  • affect the tone 
  • provide some stiffness to the action of the keys.

The trick is to get the weaving just right and find that "Goldilocks zone" that is neither too tight or too loose, but just right.  Too tight and you will have "drumming" (caused by action noise), tight tone, and small tone. Too loose, and the damping action of the cloth will be inadequate causing the tone to "leak." The strings will continue to vibrate and sound when you don't want them to do so. The touch will be spongy, with the key having too much "give" as the tangent touches the string.  In short, one has to play around with it a bit: weave, test, undo, try again.

And as the manual explains, all of this is also a matter of personal taste. What feels and sounds good and right to one player may not appeal to another player.

Weaving the listing cloth started in the bass, about ten pairs up (roughly two inches) and away from the keyboard. I left a couple inches of cloth dangling down, (it doesn't show) and began weaving the pairs, toward the keyboard. The temptation is to weave as one might do when quilting, running the end of the cloth up and down between several pairs at a time. While it's faster, it won't work. I tried (even though the manual said don't do it). So, of course, I had to do it. Just once. Just to see. What happened was that as I progressed, the cloth pulled the pairs of strings ever closer to each other until some of the pairs were all but touching. And that's a problem, of course. So I undid it, and wove each pair individually, as instructed, bringing the cloth below and above each pair and drawing it completely through before progressing to the next pair. After I did the first row, I pushed it snugly to the left to lock it securely in place and then started weaving the next row of pairs, this time weaving away from me.  The pairs that had the listing cloth on top in row one now have the listing cloth on the bottom in row two.

 
I carefully watched how close the listing cloth was coming to the tangents, ensuring I stayed at least one inch away from them so the action wouldn't be too spongy or cause drumming. I relied heavily on the photos supplied with the manual to determine how many pairs to weave before I reversed direction. According to the images, sometimes the listing cloth was quite far from the tangent. I didn't question this, but just copied what I saw.


As I neared the top of the keyboard, it was no longer possible to weave without butting up against the tangents, so I brought the cloth up and tacked it to the frame of the instrument. I left some length and looped it under, just because I wanted to play it safe in case I ever decided to loosen the weaving and would need a little extra length.


Here's a picture of the entire length of the listing cloth in place.


Now that the listing cloth is done, I reattached the lid and fall board and slid the nameboard into place. The nameboard is quite snug, and I'll ponder this as I take the next steps in completing the instrument and perhaps revisit it.


The string provided to hold the lid open was nothing more than plain string wrapped in some fine gold-colored filament or casing, which just didn't hold up. The pic below showing the string was taken earlier in the project.


I decided to substitute some 20-pound red hemp cord that I had on hand. It has good tensile strength, doesn't stretch, and holds the lid quite firmly.


At some point, when I'm sure everything is holding as needed, I'll trim that little tail off. I like the way the hemp coordinates with the red listing cloth.


Up next will be chipping to pitch. Stay "tuned" (musician-type joke) for more.

Sunday, June 07, 2020

Fallback Weights Demystified

Operating in the dark was too risky on an instrument of this price, so I broke down and wrote to the author of the clavichord manual for further illumination on what carving and weighting the keys is all about. A response came within hours and I was able to forge ahead.

Placing a key on the balance board (aka, fulcrum), I then placed, or at times gently dropped, the appropriate coin-weight on the front of the key. Naturally, the key is going to act like you've depressed it (which you have) and it will stay depressed as long as the coin-weight stays on the key. Ideally, you want to lighten - carve away - enough off of the front of the key bottom so that when you drop that little weight on the key, the key will dip and then gently return just enough so that the tail (where the thumbnail is located) of the key falls back to just touch the balance board. What is needed is removing weight from the front of the key and then, in most cases, adding weight in the form of lead wire to the back end of the key.

While it is never addressed, roofing the keys, as I did, removed weight from the back end. In my unprofessional opinion, this then caused the front of my keys to be even heavier in relation to the tail end. As a result, I ended up lightening up the front ends quite a bit.

I bought a set of Forstner bits.


The 5/8" size was used to drill out a chunk of wood from the underside of the key. I knew this wasn't going to be enough, so I also took the smaller bits and drilled out additional wood in hopes it would do the trick. It did not.


Those extra little holes are my brilliant idea of maybe shortening the time and work needed to lighten the keys by drilling out smaller holes with the other sizes of Forstner bits. After all, I had to buy the whole set. Why not try to use them? Unfortunately, it still wasn't enough and I ended up carving away more.

If I read the manual correctly, the carving on the underside is almost like the decorative roofing I did on top. But there was no way that would remove enough weight. So I made an executive decision to lighten my white keys in a totally new and different way when the extra holes didn't provide enough lightening. I carved with the barrel sanders on my Dremel.


Of course, none of this carving/lightening shows when the keyboard is in place, but I still wanted an artsy look to it (because I know it's there). And I just have to do things my way and be different. On some keys, that half-moon carving extends a little bit beyond the notch (function unknown, although I suspect it has something to do with the manufacturing and cutting process of the keyboard). Still, all these efforts did not lighten the keys enough.

My lowest key was profoundly carved and still required four pieces of lead to achieve fallback. The manual stressed that metal shouldn't be substituted for proper lightening. A hobby saw was recommended for cutting away key weight, but saws are never my tool of choice. Hence, the Dremel. Every white key needed a minimum of two pieces of lead.  Many took three.

Several of my sharps did not need any lead at all and fell back perfectly with a little bit of lightening. There was no drilling with Forstner bits on the sharps. Lightening was achieved with the Dremel and with adding lead when needed. The carving as shown in the first picture below was more akin to the roofing I did up top. The next picture is a little more creative.


Seasoned clavichord builders are probably cringing at my creativity. Don't care. I like what I did.

Below is an example of perfect fallback. Notice that the coin-weight is on the key, and the tail has gently dipped back to just touch the board. There are three pieces of lead added to achieve this.


As for the lead, the manual never says which way to drill - vertically (on the underside) or horizontally. I elected to drill the 9/64" hole horizontally. Once upon a time, I think I saw a picture online somewhere and it made sense to me. This way I could drill clear through the key, lay the key on its side, insert the wire down through the hole, and then snip it off about 1/16" to 1/8" beyond the hole. This allowed me to pound the 1/8" lead wire into the hole, allowing it to expand and completely fill the hole. I used my came lead snips from my stained glass days to easily cut the lead. In one or two cases, I was short just a small amount of weight and drilled a half hole. Worked perfectly.


You would hope that the lead supplied in the kit would be enough to finish the job. And your hopes would be dashed.  The 24" supplied fell way short. Zuckermann sells lead wire to the tune of $19 a yard (plus shipping). Yah. Not gonna happen. Not when it sells for 99 cents a foot at RotoMetals (I don't need 36"). Even with $3.95 shipping, it was still way cheaper than Zuckermann (and who knows what they'd sock me for "shipping and handling").

So, I'm awaiting the extra lead so I can finish up the keyboard. With luck, it will arrive this week. The end is in sight, and I am sooo ready for this instrument to finally be done!

Wednesday, May 27, 2020

Fallback Weights

With all the strings now on the clavichord, I need to turn my attention to key action.  Unfortunately, I have only gotten as far as setting up weights and building the jig. Beyond that, I am quite lost.

To build the jig, I took a block of wood and a small piece of 1/2" dowel. I drilled a 3/32" hole through the dowel, inserted a balance pin through it, and then nailed it into the block of wood. The keys balance on the pin so I can play with the weights and key action apart from the instrument.

These weights and the jig are somehow used to determine the amount of weight needed to cause the keys to return properly after being played with consistent action. To achieve this, weight is either removed from the keys by drilling out some mass on the underside of the key head (or doing some fancy half-moon-type carving on the front of the key) or is added by inserting lead wire (which looks a lot like the spooled solder I've used on stained glass panels), presumably further back near the tail of the key.


The manual indicates that keys one through nine need a weight of nine grams - the equivalent of one quarter and one dime, which I taped together. Keys 10 through 19 need eight grams, or a nickel and a penny; keys 20 through 29 need seven grams, or three dimes; keys 30 through 39 need six grams, or a dime and a penny; and keys 40 through 45 need five grams, which is equal to two dimes. I made up a set of those combos and labeled them each with their gram weight.


Great! But now what? How does this little jig and weights relate to the keys? In other words, how do I use this nifty little tool? The manual is incredibly short on explanation and offers zero pictures aside from a drilled out key bottom. I've been all over the Internet and YouTube looking for help. I'm soooo tired of writing to the guy who wrote the manual to ask him to explain things further. A picture of this gizmo in action would be helpful.

So, if anyone out there has built a KoS clavichord and can help me, please drop me a message! In the meantime, I will read the manual for the 20th or so time and see if a light bulb goes on.

Monday, May 04, 2020

Stringing and Tangent Challenges - Part 3

Now comes the hard part - where to place the tangents on each individual key. Tangents are hammered into the keys, and they have to be positioned fairly precisely in a north-south orientation as well as an east west orientation. The harder of the two is, in my opinion, the north-south because the method of finding where to mark is awkward, at best.

To determine the correct north-south position, we fashioned a 1/4" by 1/2" block of wood and drew a line across the top of the short side to represent the width of the tangent. This block is slipped under the strings and a pencil mark made on the key to show where the back end of the tangent will go.  As of this writing I've got six keys done. I tried to show in the following picture how two strings are crossing within that space marked off in pencil on the block of wood. That space represents the tangent.


This task is certainly not a snap because pencil lead is downright fat for this job, and it's easy to get it wrong. It would seem that I'm good with a few and then I'm worthless. Fortunately, it turns out the sous chef is pretty good at it, so he might end up marking more of the north-south positions than I will.

Next is finding the east-west position - an easier task because the blueprint shows it. Sometimes the tangent looks dead center; other times, it's off to the left or the right. The east-west position is also marked in pencil on the key.  


I cut the keyboard diagram out of the blueprint for ease of reference. (Before I began this entire project, I went to the city planning office of the little town where I was living at the time and had them make a full size copy of the bludprint. I have dreams of framing it some day.)  So why not use the blueprint to determine the north-south position as well? It leaves too much to chance. The width of the top of the tangent where it hits the strings is just a hair over 1/8". At this point, the distance between the two strings is 1/8". So precision is required. A listing cloth which is installed later will draw the strings closer together.

Not all the tangents will hit two strings. To make this easier for me to spot, I circled the pairs of tangents assigned to the same two strings. Get off by one, and you're going to be filling holes and redrilling. I also occasionally filled in key numbers on the diagram. Anything to keep me on track.

 
Next up is drilling a small hole to accommodate the tangent. The manual says it's pretty easy to split these higher keys and that if you do, you glue, clamp, wait, and then try again.  I, of course, had to come up with a plan to reduce the likelihood of a split, so rather than jumping right in with the 3/32" bit, I preceded it with a pilot hole of 1/16".  And that was preceded by a few taps of a skinny little nail to make a divot.


Yes, it's a lot of switching back and forth between two bits, but it's worth it. The danger diminishes after the first half dozen keys (or so I'm told), but I plan to continue to do this for all the keys anyway. I just want to be safe.


Hammering in the tangent with its right angle toward the back of the key is next. That'll make you cross-eyed. Again, the sous chef's opinion is called upon.


When the tangent protrudes approximately 3/4" out the bottom of the key, it's time to trim it off and check it in place for good clearance. The tangents want to twist around and bend and generally misbehave, but that's easily remedied with pliers.


Trimming the tail of the tangent with wire snips is too difficult for me, so I use my wonderful Foredom with a cutting wheel. The Foredom is probably my all-time favorite tool. I use it in silversmithing, but it has come in handy for all sorts of other projects. The Dremel would also work, but it's just one more bakc-and-forth switch that I don't want to fuss with, and the cutting wheel can stay put on the Foredom until I'm done with the instrument.


In case you're wondering, my little workbench is a nifty, collapsible DeWalt. I'm the kind of mom who asks for stuff like this for Christmas, and my son obliges.


So that's the three-part saga of stringing and tangent placement. I should be temporarily using the listing cloth to damp the tails as I work down the keyboard, but I'm not bothered by its absence at this point. That may change.

I've got 39 more keys and 50 more strings to go! Wish me luck!


Saturday, May 02, 2020

Stringing and Tangent Challenges - Part 2

Now that the strings have nice little loops on one end, I hitched them on their appropriate hitch pin. Because I'm working from the treble down, the first hitch pin I used is on the back rail, farthest to the right and closest to the treble end of the instrument. Stretching the string to approximately nine inches beyond the right side of the cabinet, I used a small scissor to cut off that length. This is the .012 sting, the thinnest of all.

Here's where the other end of the dowel with the cup hook is used. I had drilled a hole using the #30 bit (same as for the pin block) to accommodate a tuning pin. Making sure I was holding the wire tight so as not to lose it off the hitch pin, I took the other end and poked it down into the hole. I then crammed a tuning pin in the hole also. Turning the tool away from me, I made two or three wide rotations of wire to bring it up to the beginning of the flat part of the tuning pin. I was winding up the pin, from left to right.


I then turned the tool a little and began to wind the string down the pin from right to left, making sure to wind back over the left-rigt rotation and being careful to not wind the wire on itself. I tried to keep the coil as neat as possible.


After a few wraps, I removed the pin from the tool, brought the left-to-right wire out, returned the pin to the tool and continued to wind until I was over the appropriate hole in the pin block. In the picture below, you can see all my little "wild hairs" on the other strings I've wound. For now, I'm leaving those in the event I have to redo those strings because I've failed to secure them adequately and they slip. I'll try to salvage the string by unwinding it and trying again to get it right. Fingers crossed I won't have to do that.


For me, winding turning pins is a little like riding a bicycle. It comes back to you when you've been away from it for a while. Still, I'm not as confident as I'd like to be, so I'm not brave enough yet to trim those little wild ends.

The wire needs to pass over the correct pin on the bridge and come off the right side of the pin.  If it's not, it's been wound backwards and you have to carefully unwind the string and do it over, hoping against hope that the string will hold up for a second go.

Taking the pin out of the tool, I hammered it into place until it was about 7/8" above the block and turned the pin with the tuning hammer just enough to confirm that the wire was holding, but not bringing it anywhere near pitch just yet. The 7/8" in pretty important because the lid won't close if they stick out much higher. The wire should be wound to about 1/4" above the soundboard. If it's not, the wire gets spaced out more on the pin to meet that requirement or, conversely, you have to try and slide it up higher on the pin, being careful tat the string doesn't double up over itself.

Then I repeated everything on the next string to the left. Each tangent is responsible for two strings, so you have to string a pair before you go on to place the tangent. I'll tackle that blog entry tomorrow.

Stringing and Tangent Challenges - Part 1

(While my blog posts might seem exceedingly detailed, my purpose in writing this - aside from sharing with a very narrow audience - is to have a written record/diary of my journey. I hope to eventually store it all on a thumb drive to keep with my finished instrument.)

The whole process of stringing and inserting tangents is fairly involved, so I'm going to divide this into three parts.

I had a small problem with the pin block holes being too small and, in many cases, not deep enough. I had been on a bit of a hiatus (moving, moving out of state, selling a house, buying a house, you know the drill) and didn't take notes on what I did/thought or didn't do/think with that pin block, so I decided I just needed to go over all of the holes again with my #30 drill bit, take out all the keys, vacuum out the case, and then forge ahead. Done.

The top ten tangents strike extremely thin strings. The tangents' thickness is needed on the mid and low strings to produce a pleasing sound, but it's too much for the uppermost fine strings and must be thinned by half. To accomplish this, my husband (turned clavichord sous chef) used F. Dick's No.2 diamond file that I had in my silversmithing supplies (another hobby of mine which distracts me from time to time). After four to six passes on each side of the tangent, thickness was checked and additional passes made until the desired result was achieved.


While my husband worked on thinning tangents, I worked on installing a couple of strings so we could insert those tangents in their corresponding keys. It's not advisable to string the whole instrument and then try to go back and put the tangents in the keys. The reason for this is that there's a lot of removing and replacing a key as you work on it, and all those strings would get in the way. While I'm told it can be done, it makes an already tricky job more difficult. So we are inserting the tangents as we go and therefore working from the highest pitches down to the lowest.

The first step is to make a nice loop that will catch on a hitch pin and not unravel under pressure. The coil of string needs to be clamped so that you can pull on the string and form the loop.  Here's my fancy setup off a closet shelf. I've protected the coil with quilt batting and sandwiched it all between two paint sticks. A big C-clamp (which might actually be a leftover from my harpsichord-building days many moons ago) holds it all together.


About an inch from the end of the string, an angle of what I'll call a narrow 90-degrees is formed by gently bending the wire on a cup hook that has been inserted in a dowel.  The hook needs to dissect that angle formed by the wire so that as the dowel is turned, a helix is formed. Sorry the pic is blurry.


I made enough turns to produce about 3/4" of twists. At that point, I turned the short end of the wire perpendicular to the helices and make about five turns to finish off the loop. These last turns are not forming helices, but cause the short end of the wire to wrap around the long wire to make a pretty finish and secure the helices. I'll probably go back and trim the ends a little, but for now, this will do.


A note on the dowel with cup hook: I used a fairly thick dowel because this tool does double duty. One end has the cup hook, but the other end is drilled with a #30 hole to insert a tuning pin. There will be pix later on in Part 2. This setup facilitates winding the string. The skinny little dowel which was included in the kit was barely larger around than a #30 hole and promptly split when I drilled it. So I used a fatter dowel that I had purchased for another project and am quite happy with it.

My next installment will explain how I wound the strings around the tuning pins. Later...