Saturday, May 02, 2020

Stringing and Tangent Challenges - Part 2

Now that the strings have nice little loops on one end, I hitched them on their appropriate hitch pin. Because I'm working from the treble down, the first hitch pin I used is on the back rail, farthest to the right and closest to the treble end of the instrument. Stretching the string to approximately nine inches beyond the right side of the cabinet, I used a small scissor to cut off that length. This is the .012 sting, the thinnest of all.

Here's where the other end of the dowel with the cup hook is used. I had drilled a hole using the #30 bit (same as for the pin block) to accommodate a tuning pin. Making sure I was holding the wire tight so as not to lose it off the hitch pin, I took the other end and poked it down into the hole. I then crammed a tuning pin in the hole also. Turning the tool away from me, I made two or three wide rotations of wire to bring it up to the beginning of the flat part of the tuning pin. I was winding up the pin, from left to right.


I then turned the tool a little and began to wind the string down the pin from right to left, making sure to wind back over the left-rigt rotation and being careful to not wind the wire on itself. I tried to keep the coil as neat as possible.


After a few wraps, I removed the pin from the tool, brought the left-to-right wire out, returned the pin to the tool and continued to wind until I was over the appropriate hole in the pin block. In the picture below, you can see all my little "wild hairs" on the other strings I've wound. For now, I'm leaving those in the event I have to redo those strings because I've failed to secure them adequately and they slip. I'll try to salvage the string by unwinding it and trying again to get it right. Fingers crossed I won't have to do that.


For me, winding turning pins is a little like riding a bicycle. It comes back to you when you've been away from it for a while. Still, I'm not as confident as I'd like to be, so I'm not brave enough yet to trim those little wild ends.

The wire needs to pass over the correct pin on the bridge and come off the right side of the pin.  If it's not, it's been wound backwards and you have to carefully unwind the string and do it over, hoping against hope that the string will hold up for a second go.

Taking the pin out of the tool, I hammered it into place until it was about 7/8" above the block and turned the pin with the tuning hammer just enough to confirm that the wire was holding, but not bringing it anywhere near pitch just yet. The 7/8" in pretty important because the lid won't close if they stick out much higher. The wire should be wound to about 1/4" above the soundboard. If it's not, the wire gets spaced out more on the pin to meet that requirement or, conversely, you have to try and slide it up higher on the pin, being careful tat the string doesn't double up over itself.

Then I repeated everything on the next string to the left. Each tangent is responsible for two strings, so you have to string a pair before you go on to place the tangent. I'll tackle that blog entry tomorrow.

Stringing and Tangent Challenges - Part 1

(While my blog posts might seem exceedingly detailed, my purpose in writing this - aside from sharing with a very narrow audience - is to have a written record/diary of my journey. I hope to eventually store it all on a thumb drive to keep with my finished instrument.)

The whole process of stringing and inserting tangents is fairly involved, so I'm going to divide this into three parts.

I had a small problem with the pin block holes being too small and, in many cases, not deep enough. I had been on a bit of a hiatus (moving, moving out of state, selling a house, buying a house, you know the drill) and didn't take notes on what I did/thought or didn't do/think with that pin block, so I decided I just needed to go over all of the holes again with my #30 drill bit, take out all the keys, vacuum out the case, and then forge ahead. Done.

The top ten tangents strike extremely thin strings. The tangents' thickness is needed on the mid and low strings to produce a pleasing sound, but it's too much for the uppermost fine strings and must be thinned by half. To accomplish this, my husband (turned clavichord sous chef) used F. Dick's No.2 diamond file that I had in my silversmithing supplies (another hobby of mine which distracts me from time to time). After four to six passes on each side of the tangent, thickness was checked and additional passes made until the desired result was achieved.


While my husband worked on thinning tangents, I worked on installing a couple of strings so we could insert those tangents in their corresponding keys. It's not advisable to string the whole instrument and then try to go back and put the tangents in the keys. The reason for this is that there's a lot of removing and replacing a key as you work on it, and all those strings would get in the way. While I'm told it can be done, it makes an already tricky job more difficult. So we are inserting the tangents as we go and therefore working from the highest pitches down to the lowest.

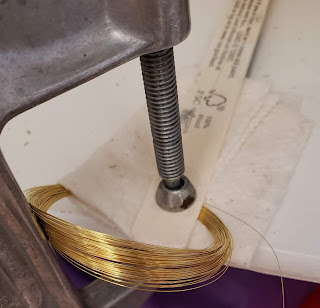
The first step is to make a nice loop that will catch on a hitch pin and not unravel under pressure. The coil of string needs to be clamped so that you can pull on the string and form the loop.  Here's my fancy setup off a closet shelf. I've protected the coil with quilt batting and sandwiched it all between two paint sticks. A big C-clamp (which might actually be a leftover from my harpsichord-building days many moons ago) holds it all together.


About an inch from the end of the string, an angle of what I'll call a narrow 90-degrees is formed by gently bending the wire on a cup hook that has been inserted in a dowel.  The hook needs to dissect that angle formed by the wire so that as the dowel is turned, a helix is formed. Sorry the pic is blurry.


I made enough turns to produce about 3/4" of twists. At that point, I turned the short end of the wire perpendicular to the helices and make about five turns to finish off the loop. These last turns are not forming helices, but cause the short end of the wire to wrap around the long wire to make a pretty finish and secure the helices. I'll probably go back and trim the ends a little, but for now, this will do.


A note on the dowel with cup hook: I used a fairly thick dowel because this tool does double duty. One end has the cup hook, but the other end is drilled with a #30 hole to insert a tuning pin. There will be pix later on in Part 2. This setup facilitates winding the string. The skinny little dowel which was included in the kit was barely larger around than a #30 hole and promptly split when I drilled it. So I used a fatter dowel that I had purchased for another project and am quite happy with it.

My next installment will explain how I wound the strings around the tuning pins. Later...